Author Study Series: [Part 4: Activities for Your Author Study]
Love podcasts? Check out this post in the form of a podcast episode on The Classroom Commute Podcast:
Wow - we are coming to a close on this mini-series all about author studies! If you've been following along from the beginning, get ready to hit the ground running with your own author study.
On the flip side, if you've just stumbled across this mini-series, then you're going to want to check out the first three parts of the series to make sure you've got all the background information.
You can find them here:
AUTHOR STUDY SERIES: [PART 1: CHOOSING AN AUTHOR]
AUTHOR STUDY SERIES: [PART 2: BOOK SELECTION]
AUTHOR STUDY SERIES: [PART 3: FORMATTING & DIFFERENTIATING YOUR AUTHOR STUDY
In this final installment of the series, I want to get specific about the types of learning activities and reading responses that work well with an author study and will help enhance your students' author study experience.
To help you get organized, I'm going to break the types of activities into four categories:
Activities to connect the students to the author
Activities to connect the books in your study
Activities for teaching reading skills and strategies through your author study
Activities to end your author study with
And finally, as a bonus, I'm going to give you some quick tips for getting your classroom ready and set up for an author study
Ready? Let's wrap this up!
ACTIVITIES TO CONNECT STUDENTS TO THE AUTHOR:
One of the main reasons you are doing an author study in the first place (as opposed to any other kind of reading unit), is to help your students engage, interact, and become inspired by your author, right? The activities below will help you do just that:

1. Begin your study by introducing some fun facts about your author. In every author study unit I’ve done, the very first lesson includes reading a short biography about the author and exploring some interesting facts about the author as a person. These facts often include information about the author's life as a child. This helps students to see that the author was once young like them, with hobbies and interests that they may even have.
I also usually include some facts about the author's family, schooling, and even some of their hardships in life and how they overcame them. I especially like showing students that authors, too, have struggles in life, and still are able to be successful. Patricia Polacco is a great example of this. Students are surprised to find out that she has a learning disability and struggled through school growing up.
2. Listen to or watch a recording of the author reading their own books. Students love this! They love hearing the books in the author's own voice. YouTube is a great resources for this. If you happen to find an audio or video recording of a book from your study as told by the author, have students listen/watch it as an alternative to hearing you read it to them. You can even have students illustrate the events and characters of the story as they listen to it.
3. Watch or read an interview with the author. I prefer a video interview if I can find one, but certainly will use a written interview if that is all that is available. A video interview, I feel, helps students to make a stronger connection by being able to see and hear the author talk. However, if a written interview is all that is available, be sure to include lots of pictures (from the past as well as current pictures) of the author for students to refer to. Reading Rockets has a large list of author interviews that you can refer to. I will often include an interview of the author during the first few lessons of my unit. This video clip is a great example, interviewing and reviewing the works of Beverly Cleary.

4. Have students write a letter to the author. They can write to the author about their favorite book, character, event...etc., and even ask the author questions that they are wondering. Many author's have websites that have contact information. You just might even hear back!
5. Create a class list of questions and wonderings that they have about the author. As you read the author's books and discuss their life, keep track of these questions and wonderings. Refer and add to it often throughout your study.
6. Make a list of things you and your students are noticing about the author's writing style. Create a list of common topics that the author includes in his/her writing, or ways that the author likes to begin or end a story, and so on.
ACTIVITIES TO CONNECT THE BOOKS IN YOUR STUDY:
Another important element of an author study is showing how the books connect. Here are some easy ways that you can do it:
1. Create an attribute chart. An attribute chart will help you and your students compare the characters, settings, plots, illustrations, and other notable elements of each book. A simple chart might look like this:

2. Use a Venn Diagram. A teacher's favorite tool (or one of them!), right ? You can have students compare and contrast two books, or even two different characters from two different books. This can be done as a whole class, or even as partners/individuals.
3. Create book categories with your students. As you read the books in your study, have students put the books into groups. This is a great activity if your author writes in a variety of genres. As you read, create several genre baskets and after you finish reading the book, have students decide which basket it goes in. However, if your author mainly sticks to one genre, have your students come up with other creative ways to group the books such as types of illustrations, or books with the same characters...etc.
ACTIVITIES FOR TEACHING READING SKILLS AND STRATEGIES:
As I have reiterated several times in this mini-series, author studies can be used as a vehicle to teach your curriculum. Here's a list of ways you can incorporate skill and strategy instruction into your author study:
1. Use the author's books for modeling great writing. We want our students to use the author as a "writing mentor." Help point out unique ways that the author begins and ends their stories, creates strong characters, or uses specific language. Keep a list and refer to it often when students are writing their own stories.

2. Teach theme. Often books by the same author will carry similar themes. Teach and compare these themes throughout your author study. This is exactly what I did in my Eve Bunting author study. You can read about it in part 2 of this mini-series.

3. Use the story mountain to teach plot. One of my favorite ways to teach the structure of a story is to use the story mountain. It's an easy way for students to see the flow of a story and how it all fits together. In an author study, I often have students complete a story mountain for at least 2 books that can easily be compared. Students can refer to the story mountains to see similar features of the story.
4. Teach character analysis and development. Although you can teach character analysis and develop in any book you are teaching, it can be especially revealing if a character appears in several books by the same author. For example, Patricia Polacco often writes stories about herself as a child, and her character, Trisha" appears in several books. After reading several of her books that include her as a character, students can record important information about Trisha. They can note things that they learn about her, how she reacts to tough situations, and analyze her actions, thoughts, and words.
5. Create lists and charts representing reading skills and strategies.
Lists are a great way for students to record information quickly and can refer to them often. Here are some lists you might create to help teach and reinforce skills and strategies being learned through your study.
collect samples of descriptive language that an author uses
organize characters from the different books based on character traits
create a list of different types of words used in the author's books (ex. new words, strong adjectives...etc)
create a list of different types of settings the author uses (students can use these in their own writing)
Use these examples to help you think about how what you are teaching can be turned into a list format. I like these types of lists because they are easily added to and referred to throughout your unit.
6. Have students use and apply author's craft. In an activity during my Chris Van Allsburg Author Study, I have students explore the ways that Van Allsburg uses strong descriptive words to paint a picture in the reader's mind. Students use the book Jumanji (affiliate link) to find strong verbs that the author uses, and then illustrates the image that comes to mind when reading that verb. The lesson includes a discussion on how we can use strong verbs in our own writing to create a more detailed picture in the reader's mind.
7. Practice fluency and expression through reader's theater. I'm a huge fan of reader's theater. I incorporate it wherever I can; in reading as well as in the content areas. Why? Because it gives students a chance to learn or review something in a unique way AND practice fluency and expression. One way I do this in an author study is to take an excerpt from a story, and turn it into a reader's theater script. To do this, I take the dialogue of the characters and retype it up in a script format. I will use the narration (non-dialogue portions of the story) and assign that text to a "narrator" in the script. You can easily adapt the text as needed for differentiated instructional purposes.
After reading a book (or several books) by the author, divide students up into groups and give each group a reader's theater script representing an excerpt from a book by your author. Each group can have excerpts from the same book or different books - your choice! If using excerpts from the same book, you can sneak in a little sequencing instruction in there as well!
If using excerpts from different books, try choose excerpts from each book that the students can easily compare and contrast. For example, if you've been talking about character traits or character analysis, choose excerpts from each book that shows strong characters. After students perform their script for each other, have a discussion about how the author creates strong characters in his/her stories.
If you have older and more advanced students, challenge THEM to create the reader's theater script using a selected book. This would be the makings of a great lesson on how to write using dialogue!
ACTIVITIES TO END YOUR AUTHOR STUDY:
Here are some fun ways to wrap up your unit in meaningful ways:
1. Make a graph of the students' favorite books or character by the author. At the end of your unit, give each student a post-it note and have them write down the title of their favorite book or character. Use the post-it notes to create a bar graph showing the students' picks.
2. Have an author study celebration. Spend the afternoon with snacks and the author's books. Have students reread the books to each other in small groups, or even invite in a younger class to read the books to. Encourage parents to come in and celebrate with their child!
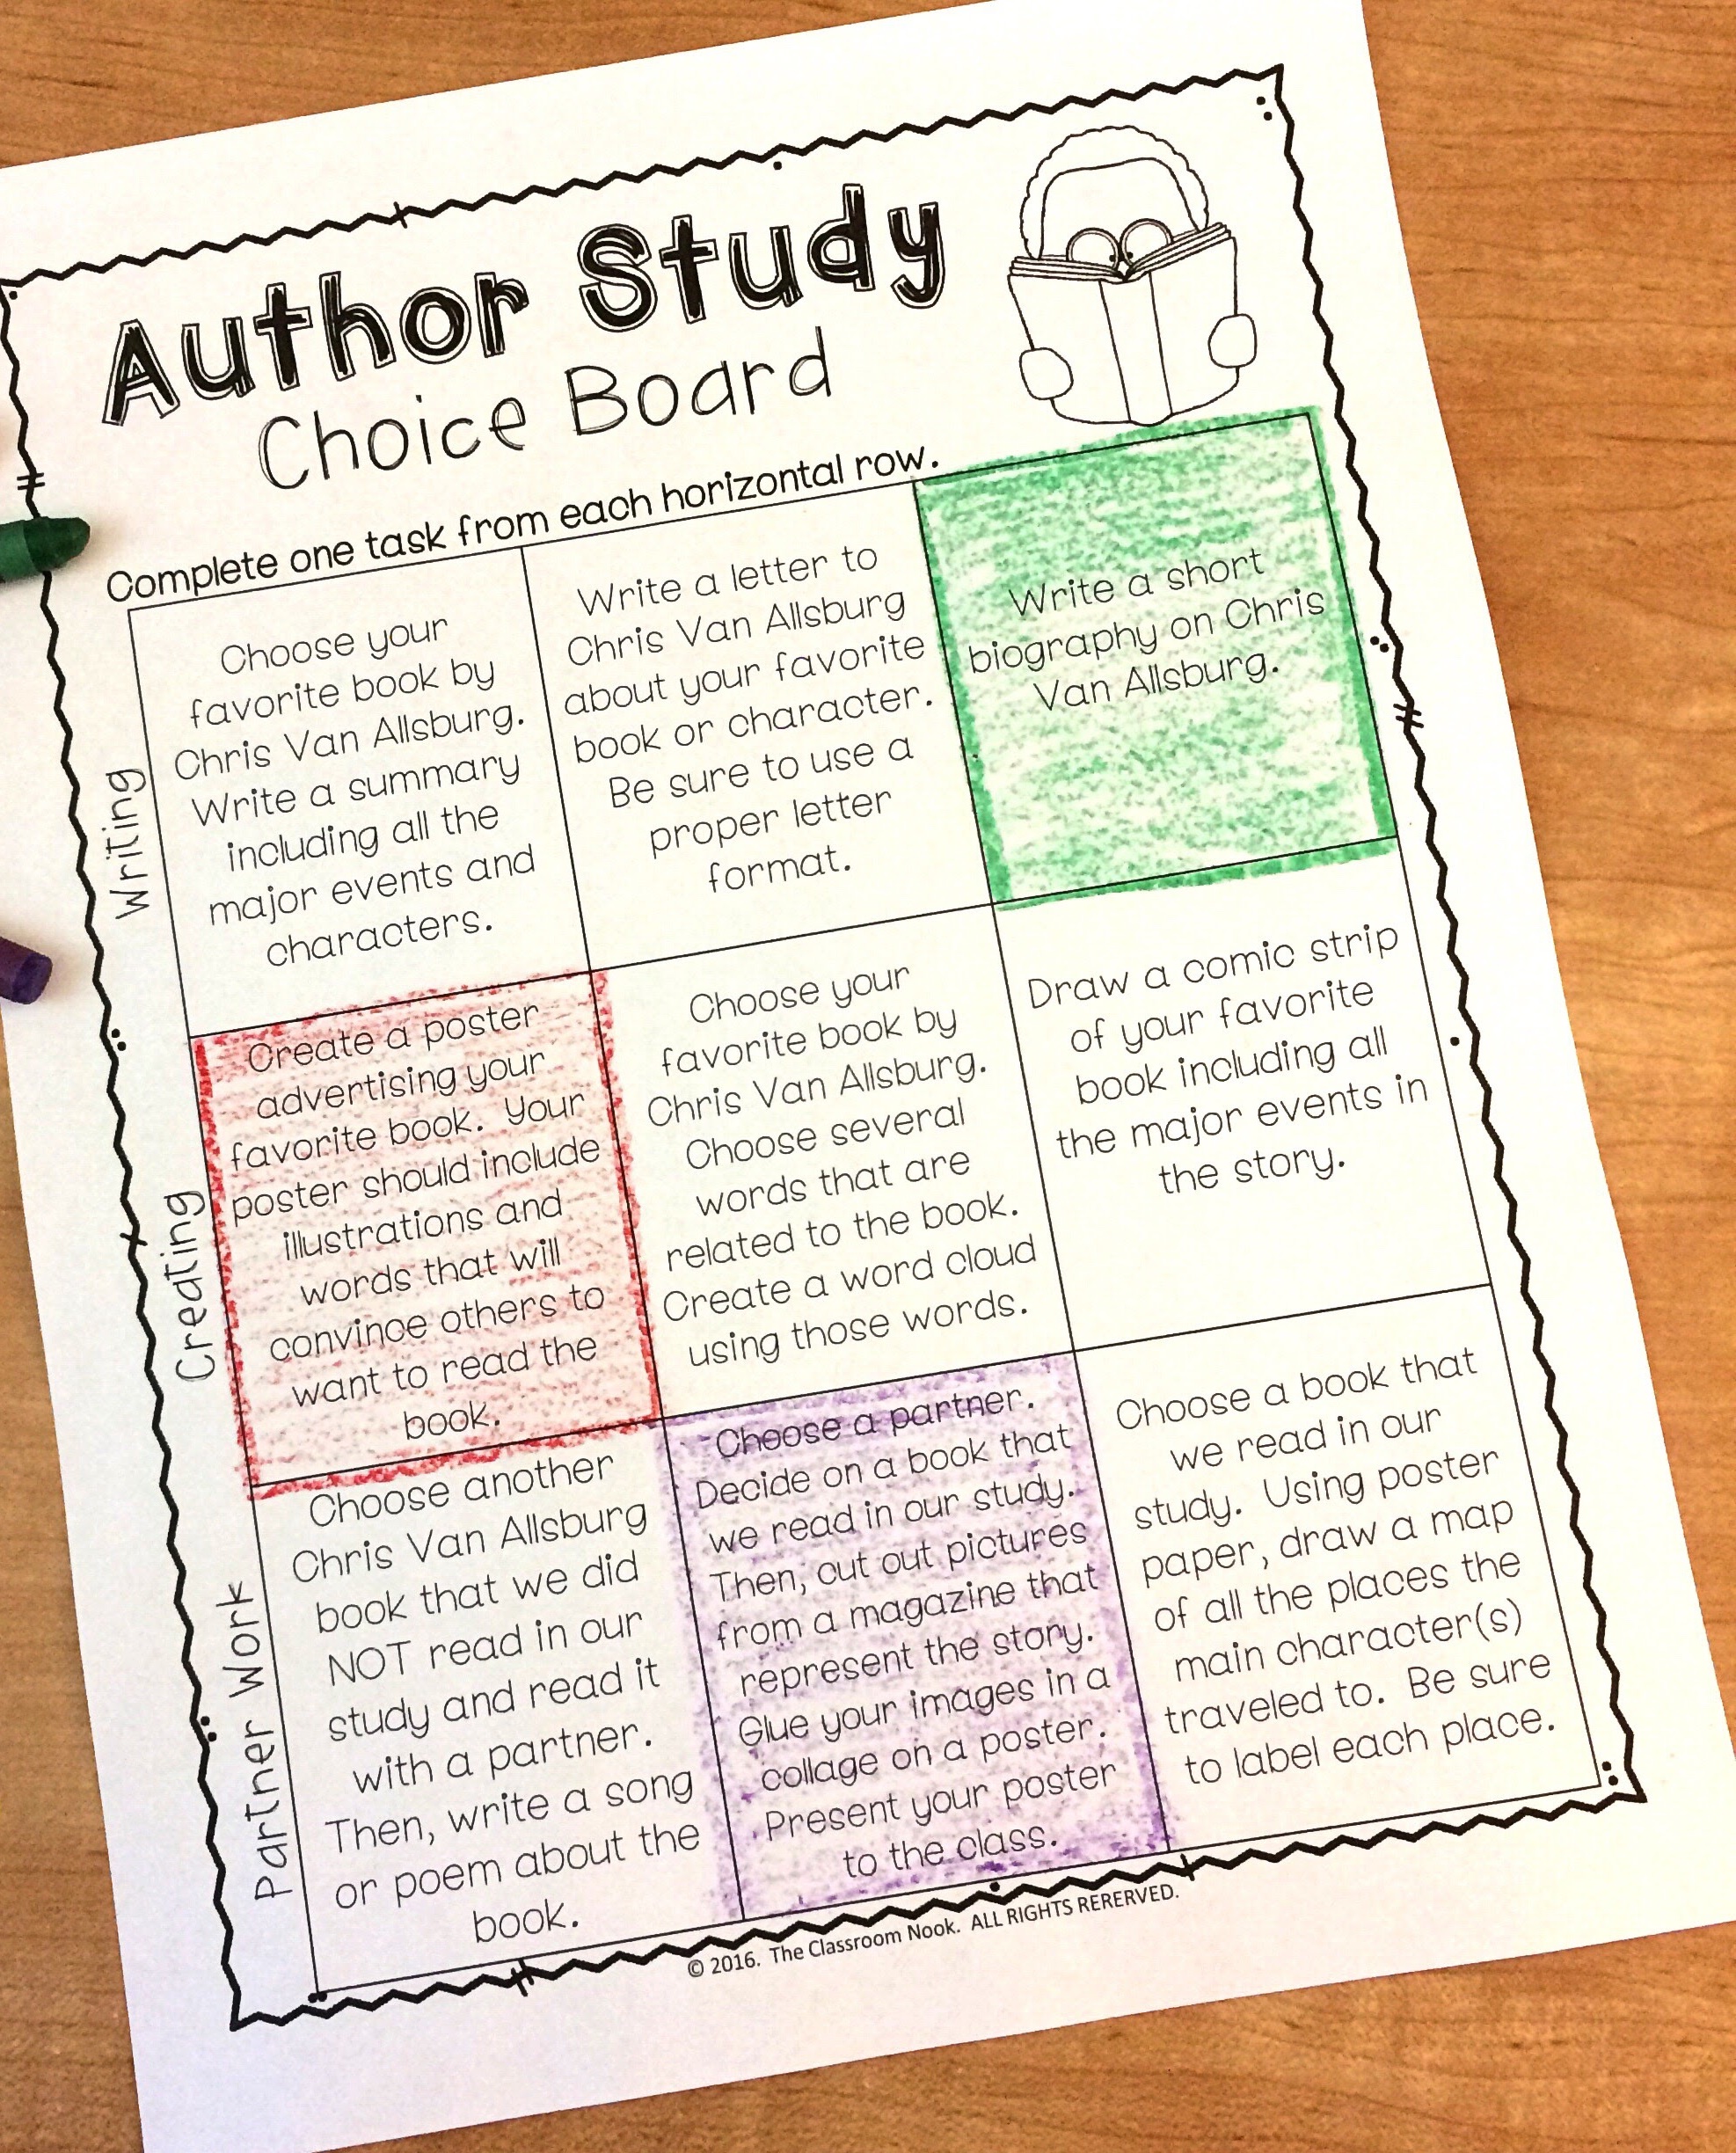
3. Have students use a choice board to complete author study-related projects. I did this with my Chris Van Allsburg author study. These activities can include crafts, writing book reviews, writing a sequel to one of the author's books, writing a short biography about the author, or even designing a poster advertising their favorite book.
4. Create a class "quilt" with their favorite book scenes. Have students choose their favorite scene from any book they read during the study. Provide each student with a paper quilt square to illustrate that scene and provide a short caption describing the scene. Combine all the squares into a class quilt.
5. Have students dress up as their favorite character. Pick a day for students to come in dressed up as their favorite character from any book by the author. Encourage them to talk and act (if appropriate) in ways that the character would for the day (or for a specified time during the day.) Extend the activity by having the students interview each other using general-type questions that they might know about their character (ex. What are your favorite hobbies? Do you have any siblings?). Students would answer the questions in the way that their character would.
6. Prepare a "Guess That Book!" activity. When finished reading all of the books in your study, choose excerpts from several of the books to read back to your students. Have students try to guess which book the excerpt was from. You will want to photocopy or retype the excerpt onto a different piece of paper so that students don't know which book you are reading from. Turn it into a competition by dividing students into teams.
GETTING YOUR CLASSROOM READY FOR YOUR AUTHOR STUDY
Make your author study stand out in your classroom! Here are some things you might considering doing to prepare your room for your author study:
Make a bulletin board with pictures of your author (from childhood to adult)
Have an ongoing chart posted where students can write down thoughts and questions that they have about the author and their books.
Have a cozy area of your reading corner designated specially for reading books by your author. Place a basket of books that you have completed during your author study, or even books by the author NOT included in your study, for students to read on their own.
Create a "fun facts" board in your classroom listing facts about your author.
Prior to your study, arrange for parents, your principal, other teachers in your building, and/or other volunteers to come in to your classroom to read aloud a book from your study.
Make a timeline of book covers. Show the order in which each book was published by gluing the book covers onto a large sheet of butcher paper or even on a bulletin board.
Wow - over the past 4 weeks we have covered a LOT of material. It is my hope that you've been able to pick out some gems to apply to your own classroom. If you've never done an author study before, I challenge you to make this year the first year that you do!
And - if you're left thinking "When will I ever have the time to design my own author study?", OR if you just want a clear model of what an author study looks like from start to finish, I encourage you to check out the following studies that I have put together over the past few years. They have been used in hundreds of classrooms and have been highly rated.
Thanks so much for joining me in this mini-series.
OTHER POSTS IN THIS MINI-SERIES: